It is almost Father's Day so it's time to think about a gift for your dad or hubby if you have kids. I love to make gift baskets and DIY projects, they are so fun and you can make them personalized for the person you are gifting. One of my favorite DIY projects is a sport's theme subway sign. You can make it for any team so it is the perfect anyone! I've made an Alabama one for my husband and today I'm creating a Washington Redskins sign for my dad. He has always been a huge Redskins fan so this DIY sports sign will be perfect for him!
Note: This post contains affiliate links. This does not mean you pay a dime more when you purchase a product through my link. It just means I made it easier for you to find something, so I may make a few cents when you click/purchase it. I appreciate your support! You can read my full disclosure by clicking here.
To make a DIY Sports Theme sign you will need a few supplies:
- Wood for Sign (I cut a 1x8 down to 16")
- Chalkboard Craft Paint
- Rubber Gloves
- Sandpaper- 220 grit
- Old Rag
- Foam Paint Brushes
- Silhouette CAMEO 3 Bundle
- Stencil Film
- Transfer Paper
STEPS TO MAKE A DIY SPORTS THEME SIGN
STEP 1: Cut wood to the size needed for your sign. Next, give the wood a good sanding to make sure it nice and smooth. I like to give my signs a base so I paint the wood white for a fresh and clean surface. Then choose which color you want the background of your sign to be and paint or stain your wood sign. Make sure to let it dry in between coats until you get your desired color.
STEP 2: I used Silhouette Studio that came with my machine to create my design.
STEP 3: For this project, I used stencil film to create a stencil to be able to paint my design on the sign. This is such an easy way to create beautiful signs. See my DIY Fall sign post (here) to see how to make a similar sign using vinyl. I loaded the stencil film into my machine and printed it like I would do with vinyl.

STEP 4: After the design was printed, I unloaded the stencil film and cut it to size. Since I am using this as a stencil, the weeding process is a little different than my other tutorial. I used the hook tool to carefully weed out the letters of my design, making sure to leave any "inner" letter pieces.

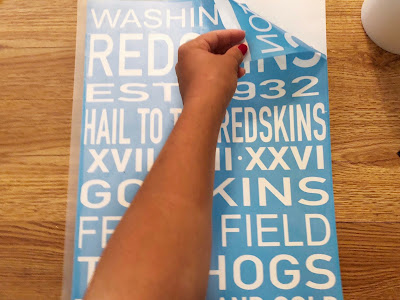
STEP 5: Transfer paper is needed to transfer the stencil to the sign to be painted. I covered my entire design with pieces of transfer paper. Using the scraper tool that came with my machine, I pressed over the design to make sure there were no bubbles and the design was fully transferred.
STEP 6: I carefully pulled the transfer with the stencil attached from the paper backing. Then I laid the transferred design onto the sign, making sure it was centered and there were no bubbles. Once again I used the scraper to make sure it was on there good!
STEP 7: After the stencil was placed, I used craft paint to paint my design on my sign. I used a foam brush and made sure to use a light hand and a dabbing motion to apply the paint. Less is more with this! Using too much paint can cause the paint to bleed through the stencil and ruin your design so be careful!
STEP 8: Lastly, after letting the paint dry for 5 minutes I slowly pull off the stencil to expose the finished design. And that's it you're all done!
Below are the finished signs! This was such an easy and fun sign to create that I think anyone would love. I love the distressed look to the sign and really think it is what makes the sign so perfect.


Post a Comment